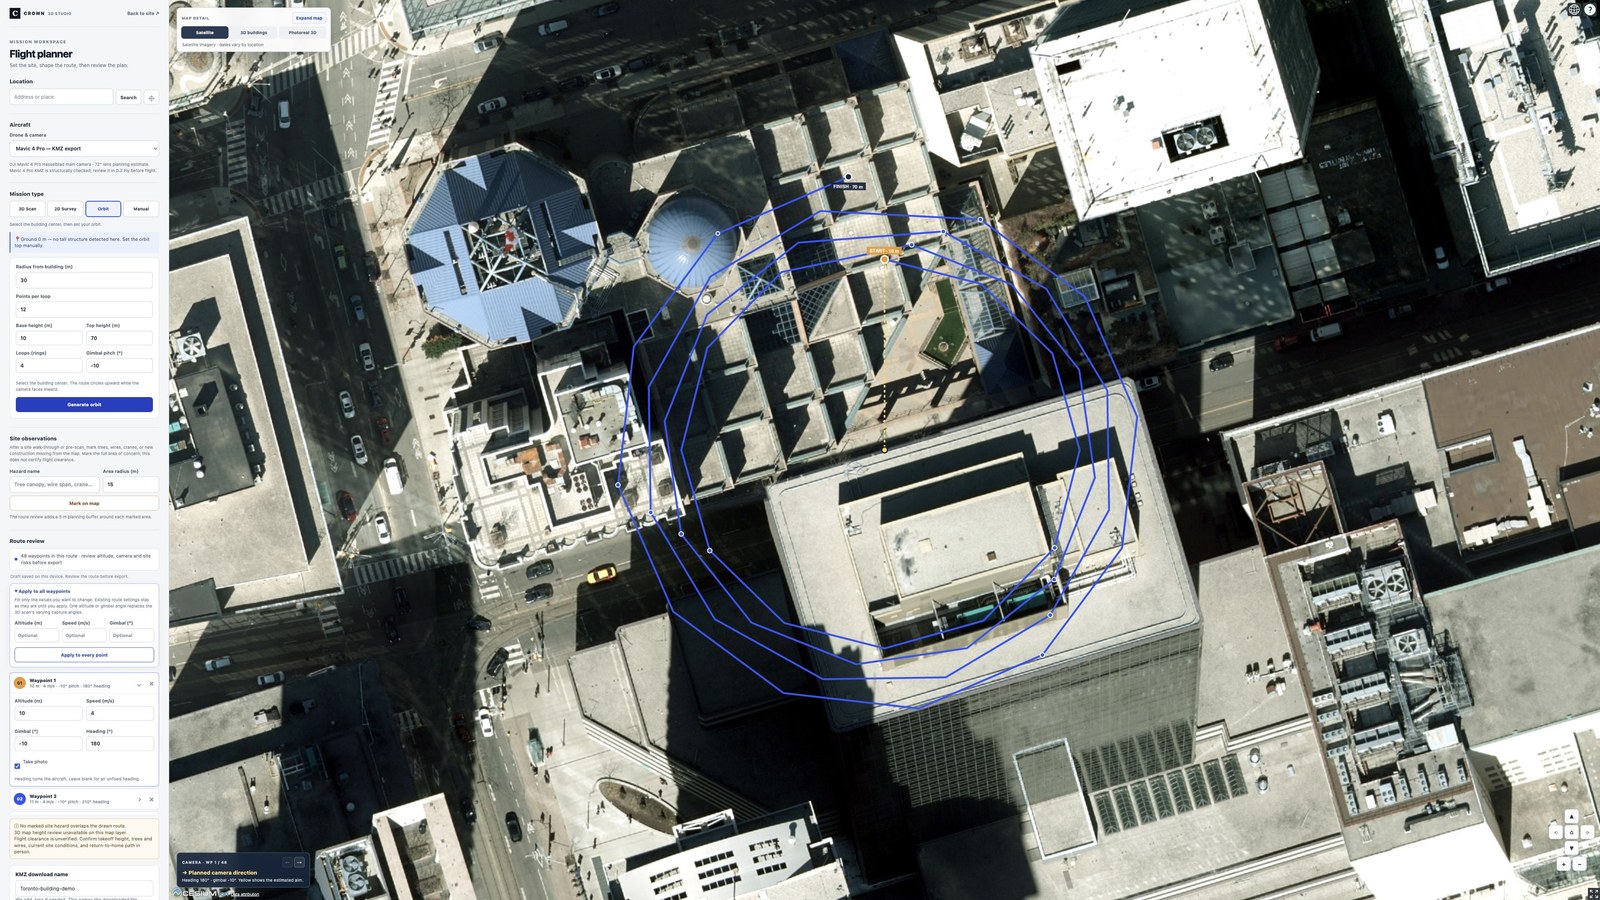
1. Choose the subject
Open the planner, find the site and select “Orbit”. Click the centre of the building or subject you want to circle. Check that the point matches the real subject; the map may show an older view.
An orbit keeps the camera heading toward the centre. A building scan also adds roof and facade passes; choose 3D Scan when you need that combination.
2. Set radius and height
“Radius from building (m)” sets the distance from the centre point to the orbit path. It is not a distance from the facade. If a building extends 20 m from the centre and you enter a 30 m radius, the plan leaves about 10 m beyond that side before considering anything else at the site.
That simple example is geometry, not an obstacle-clearance result. Check the entire perimeter, including corners, neighbouring structures, trees and wires.
Set “Base height (m)” and “Top height (m)”. When these differ, the generated points rise or descend along the route. To preview a level orbit, use the same value for both. Confirm the mission’s height reference in the flight app before use.
3. Choose loops and point count
“Points per loop” sets how many positions are placed around each circuit. “Loops (rings)” sets the number of circuits. The planner spaces the positions around the centre and changes height across the full route.
| Control | Example value | What it changes |
|---|---|---|
| Radius from building | 30 m | Distance from the centre to the path |
| Points per loop | 12 | Waypoint spacing around each circuit |
| Loops (rings) | 4 | Four circuits; 12 × 4 = 48 waypoints |
| Base / top height | 10 m / 70 m | A rising route across the 48 points |
| Gimbal pitch | −10° | A camera tilted slightly below horizontal |
These values describe this demonstration, not a recommended flight for another site. More points alone do not guarantee better photographs or a better model. Review the framing, route length and estimated mission time.
4. Generate and inspect camera aim
Choose “Generate orbit”. Select a waypoint on the map or in the list. The camera panel and yellow aim line show the planned direction. Use the previous and next controls to inspect several points around the subject.
Check whether the subject stays in frame at the bottom, middle and top of the route. Heading turns the aircraft around the centre; gimbal pitch tilts the camera up or down. They affect different parts of the view.
Generating again creates a new set of waypoints. If the planner asks for a centre, click the subject again. Reapply any waypoint edits after regenerating and review the result.
5. Review the site and export support
- Check the full route, including the connection between loops and the start and finish.
- Use “Site observations” to mark hazards you actually observed, then run “Review route risks”. An unmarked area is not confirmed clear.
- Use the waypoint checklist before preparing a file.
- Check aircraft support. Mavic 4 Pro KMZ preparation is structurally checked; the other listed profiles remain planning previews.
Review any exported mission in DJI Fly and verify the current site, conditions and applicable flight requirements before flying. Crown’s route preview is a planning aid, not collision avoidance.